Introduction to data sources
Data sources are one of the most versatile and powerful features of Notion. Working programmatically with your data sources extends Notion's functionality infinitely, as you can use Python for all kinds of transformations, external data services, and much more. Ultimate Notion unleashes the full power of Python for use with Notion's data sources. So let's see what we can do.
Searching for a data source
Assume we have a data source called Contacts DB.
import ultimate_notion as uno

notion = uno.Session.get_or_create()  # if NOTION_TOKEN is set in environment

contacts_dbs = notion.search_ds('Contacts DB')

assert [db.title for db in contacts_dbs] == ['Contacts DB']
The method search_ds will always return a list, as Notion gives no guarantees that the title of a data source is unique. Practically though, most users give data sources unique names, and to accommodate this, the returned list provides a method .item(), which will return the item of a single-item list or raise an error otherwise. Another possibility is to retrieve the data source by its unique ID.
contacts_db = notion.search_ds('Contacts DB').item()
# or in case the unique ID of the data source is known
contacts_db = notion.get_ds(contacts_db.id)
The DataSource object provides access to many attributes like title, icon, description, etc.
assert contacts_db.description == 'Database of all my contacts!'
Creating a data source and adding pages
A simple data source with the default columns Name for the title of pages and the Multi-select column Tags can be created using create_ds. To tell Notion where to put the data source, we have to provide an existing page. Let's assume we have a page called Tests that is shared with our integration:
root_page = notion.search_page('Tests').item()
my_db = notion.create_ds(parent=root_page)
Using the my_db object, we can now set its attributes, e.g.:
my_db.title = 'My DB'
my_db.description = 'This is my data source for cool Python libraries!'
Info
Unfortunately, the Notion API does not support setting the icon or the cover of a data source.
We can now simply add a new page to this data source and set some attributes:
new_page = my_db.create_page(name='Ultimate Notion')
new_page.description = 'Notes about Ultimate Notion'
new_page.icon = '🚀'
new_page.cover = uno.url('https://www.notion.so/images/page-cover/woodcuts_2.jpg')
This is how My DB looks right now.
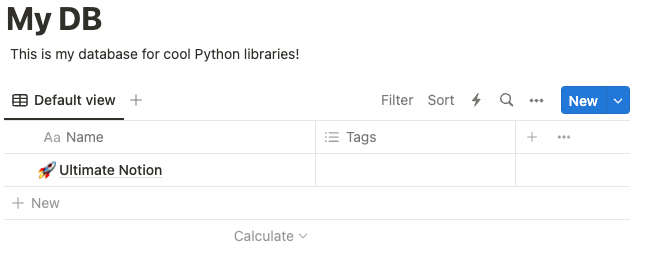
But how can I figure out which keyword arguments to pass to create_page? For this, we can take a look at the schema of the data source, which also allows us to create new pages in a neat way. As our data source holds tools, we can express this by naming the variable for the schema accordingly. An example illustrates this:
Tool = my_db.schema
Tool.show()
This shows us that our data source has two columns, Name and Tags, as well as the name of the arguments for create_page.
Name    Property     Attribute
------  -----------  -----------
Tags    MultiSelect  tags
Name    Title        name
A new page can now also be created using Tool, i.e.:
new_tool = Tool.create(name='Ultimate Notion')
This is basically just an alias for create_page but can make your code much more expressive.
Viewing the pages of a data source
Assume we have a simple data source listing tasks like this:

To access the tasks, i.e., the pages within this data source, we can use the get_all_pages method to generate a View. It's as simple as:
task_db = notion.search_ds('Task DB').item()
task_view = task_db.get_all_pages()
To get a quick overview of our tasks, we can use show. On the console, this will print:
Task                              Status       Priority    Urgency    Due Date
--------------------------------  -----------  ----------  ---------  -------------------------
Clearing out the cellar           In Progress  ✹ High      🔥 -3w6d   2025-07-23 21:10:00+00:00
Run first Marathon                Done         ✶ Low       ✅         2025-08-05 11:00:00+00:00
Pay yearly utility bills          Blocked      ✹ High      🔥 -1d     2025-08-18 16:10:00+00:00
Call family                       Done         ✶ Low       ✅         2025-08-19 16:10:00+00:00
Complete project report for work  In Progress  ✷ Medium    🕐 3d      2025-08-23 16:10:00+00:00
Build tool with Ultimate Notion   In Progress  ✶ Low       🕐 2w2d    2025-09-05 16:10:00+00:00
Clean the house                   In Progress  ✶ Low       🕐 3w5d    2025-09-15 16:10:00+00:00
Read book about procrastination   Backlog      ✷ Medium    🕐 13w     2025-11-19 16:10:00+00:00
Plan vacation                     Backlog      ✹ High      🕐 18w     2025-12-24 16:10:00+00:00
or in JupyterLab this will be shown as:
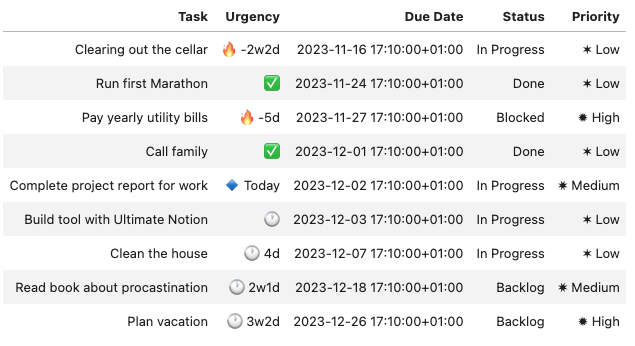
Special columns for the index, the page's ID, and its icon can be activated using with_index, with_id, and with_icon, respectively:
task_view.with_index().with_id().with_icon()

The index can now be used to retrieve a specific page with get_page, or we could just convert the whole view to a Pandas dataframe with to_pandas.
Working with views
Views help you set the stage for various operations like exporting with the help of the various to_* methods or applying a function to the contained pages using apply. With select, the view can be restricted to certain columns, whereas head (with alias limit) and tail can be used to restrict the number of rows in the view, e.g.:
task_view.select('Task', 'Status').head(3).show(simple=True)
Task                      Status
------------------------  -----------
Clearing out the cellar   In Progress
Run first Marathon        Done
Pay yearly utility bills  Blocked
All methods return a new view without modifying the current one, which allows keeping different views at the same time. To reset the current view object, the reset method can be used. To reload the view, i.e., re-execute the query that led to the view, use reload.
Find out more about the functionality of View by reading the API references, but keep in mind that some methods are just stubs.
Databases: containers of data sources
Since Notion API version 2025-09-03, a data source always lives inside a database container, and a single database can hold more than one data source. Ultimate Notion keeps that container transparent, so a data source presents as a direct child of its page, but exposes it as a Database object whenever you need to work with the container itself.
Use create_db to create a database together with its first data source:
class Item(uno.Schema, db_title='Items'):
    name = uno.PropType.Title('Name')

class Customer(uno.Schema, db_title='Customers'):
    name = uno.PropType.Title('Name')

shop_db = notion.create_db(parent=root_page, schema=Item)
assert len(shop_db.data_sources) == 1
Add further data sources with add_ds and remove them again with delete_ds:
customers_ds = shop_db.create_ds(schema=Customer)
assert {ds.title for ds in shop_db.data_sources} == {'Items', 'Customers'}

shop_db.delete_ds(customers_ds)
assert [ds.title for ds in shop_db.data_sources] == ['Items']
Given a data source, you can always retrieve its container database via its database_id:
items_ds = shop_db.data_sources.item()
assert notion.get_db(items_ds.database_id) == shop_db
Finally, delete the whole database (and all of its data sources) again:
shop_db.delete()